Hi all this blog is created to share with you a Pega tutorial, this tutorial is not theory it will give you a great insight about pega and how to manage the tool, you will practice by creating an application from scratch and review all the rules that we see on the CSA and CSSA courses, hope you like it
Hi there, you will learn today how to create a new application in Pega. But first of all, what is Pega: Pega is a low-code software platform that helps organizations build applications to automate business processes, manage workflows, and make smart decisions using AI and rules. It’s widely used in industries such as banking, insurance, healthcare, and government to enhance efficiency and improve the customer experience. Saying that, to create the application, you can do it from Dev Studio following these steps: Log in to your Pega environment and click on Application and then New Application. It will appear showing the option to build from scratch or find an application type that Pega has already OOTB. If we click on search all types, it will show all the applications already created in Pega or the OOTB application that has all the assets predefined. Since im working with the personal edition, it doesn't show all the preloaded applications, so we are going with the option t...
Step by step How to create a SOAP Connector in pega
-
Hi, in this tutorial, you will learn how to create a SOAP in Pega. To do so, we are going to use the service creation wizard.
In dev studio, click on Configure > Integration > Create SOAP Integration
. It will open up the wizard. The first step is to provide the WSDL URL, which is the address where the XML document describing a web service can be accessed.
For this example, we are going to use the following WSDL: http://www.dneonline.com/calculator.asmx?WSDL.
We click on next, and it will show the service name, port name, and endpoint. It will give us the option to test and select the operation name. When we finish testing, we click on next.
Then it will show the integration layer, it will show the name of the integration, the class, and the context there, where we can define the class where this integration will be created, as well as the rulesets.
We can click on preview records to check the rules that the wizard will be creating for the integration. It will show all the information in a modal, and it will show the record type and the number of records.
We click create and it shows an error. When we are creating a SOAP service, it seems that the wizard doesn't create the class automatically, and for that reason, we are getting an error when creating the service.
Now we create the class where all the assets that this service needs will be referenced.
Then we click on create again, and this time the SOAP connector was created. It will show all the information about it: the class, the ruleset, the WSDL, and the data sources created. At this point, if you made a mistake, you can click on undo the generation, and all the rules and data will be deleted from the system.
we click on close.
We go to the class where we create the integration, click on calculator, then click on integration-connectors and connect soap, and there it will show all the connectors created, one for each operation.
We can open a connector rule, verify all the information about the endpoint, and error handling, processing options, and simulations will be configured from here.
If we click on the request tab, we will find the headers, if they exist, and the request parameters. If we open the rules AddParameters, we will find the XML stream rule that contains all the mapping required for the service. You can verify the same on the response tab.
Now, we need to create a data page that will call the connector.
First, we are going to create the class in the data layer for our application. Then we create the data page
then in the source of the data page, we select the connector, then on the type, we select SOAP and then on the name we select Add we are going to make the example as add then you can try doing it with the others operations and let me know in the comments if you find any issues creating it
Then we need to create the request data transform. For this data transform, you will need to pass two parameters, intA and intB. It is important to define these parameters in the request data transform and in the data page.
Then, we map the two variables that we need to make this service work, and we define the parameters in the data page.
For the response data transform, Pega creates a boilerplate data transform, but you can modify it as per request.
I found an issue every time that the system returns the response in a page, you have to create the property where you will map the data, and then. Map one-to-one the values. If you notice that after running the data page, the response value wasn't mapped, it was because that one-to-one set was missing
you can watch the step-by-step in the following video. Please comment if you have questions or feedback. Hope you liked the tutorial
Complete integration Step by Step:
First, you need a WSDL for this example. We are using: http://www.dneonline.com/calculator.asmx?WSDL
Verify if any authorization settings or headers are needed for a successful response. You can try integrations in Postman and check how the request is made.
If you have all the information above, you can start to create the integration in Pega. To do so, click on Configure>Integration >Create SOAP Integration.
it will request the WSDL, and then you can select all the methods that it provides. You just need to follow the instructions on the wizard.
After the wizard is completed, you can verify the class and all the rules created by the wizard. To check if the integration is working, open the connector and scroll down to the bottom. You will find an option to test connectivity. If the integration returns an error or cannot connect, you will find an error there
Then we need to create the assets to invoke the integration on the data class. You create the data page to invoke the connector, properties for the data output of the request, request data transform and response data transform.
map the parameters
We map the request on the request data transform and the response data transform that goes in the data page.
We click on actions and then run, and it will request the parameters that we pass to the data page, it will return a response and the status will be valid, if there are any errors will be finding the errors here
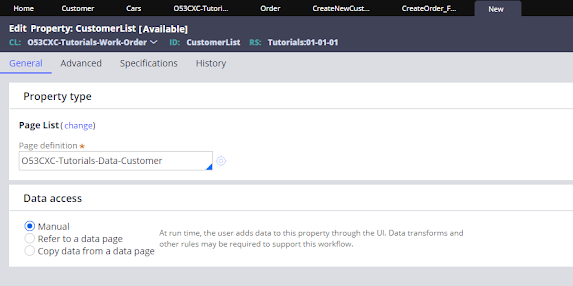
Hi All, recently I had some troubles saving a list into a data type, that is something that I have never done before and there is so little information about it in the pega community sites, so let's get this done to start you have to create a data type and have records on in, if you don't know how to do that, you can watch this video explaining step by step how to create a data type https://youtu.be/rYex_UsTtMg . The next thing that you will need is a page list property, when you are creating the page list property in page definition you have to add the class of the data type. Once we create the page list the easy way to add records to it is through a table so on your section you can configure a table to configure a table select property on general than in order to add data, on table settings click on Operations and in row editing select inline and then click the row to edit and submit save the section and test by adding some data to it, you wil...
Hi there, you will learn today how to create a new application in Pega. But first of all, what is Pega: Pega is a low-code software platform that helps organizations build applications to automate business processes, manage workflows, and make smart decisions using AI and rules. It’s widely used in industries such as banking, insurance, healthcare, and government to enhance efficiency and improve the customer experience. Saying that, to create the application, you can do it from Dev Studio following these steps: Log in to your Pega environment and click on Application and then New Application. It will appear showing the option to build from scratch or find an application type that Pega has already OOTB. If we click on search all types, it will show all the applications already created in Pega or the OOTB application that has all the assets predefined. Since im working with the personal edition, it doesn't show all the preloaded applications, so we are going with the option t...

Comments
Post a Comment